Quick Guide to Installing Floating Shelves
Apr 29, 2025
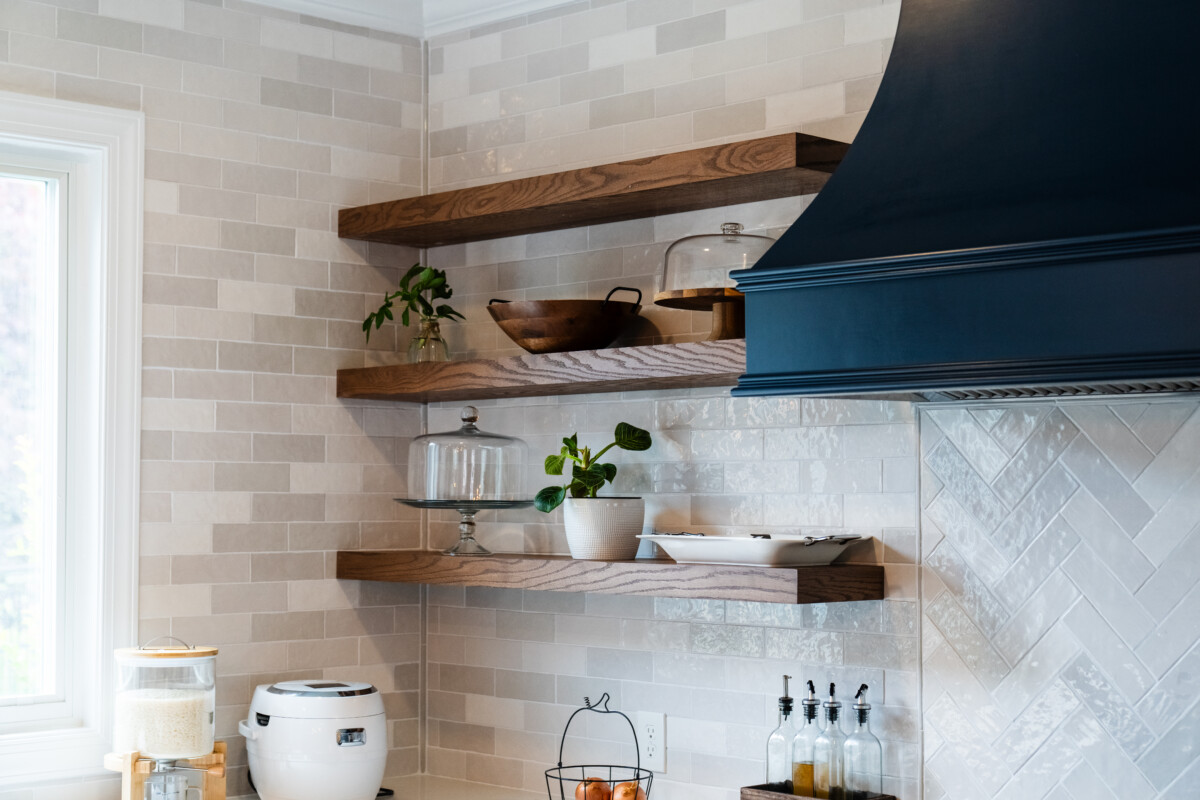
Floating shelves are one of the hottest home design trends—and for good reason. A floating shelf adds clean lines, a minimalist look, and a modern touch to any space. With no visible brackets or supports, these shelves appear to “float” against the wall, making them a sleek and functional solution for storage or display.
If you’re thinking about installing floating shelves, this guide will walk you through everything you need to know—from choosing the right type of shelf to mounting it securely on your wall.
What Are Floating Shelves?
A floating shelf is a wall-mounted shelf with hidden internal brackets. These shelves are ideal for showcasing everything from glassware and books to art, plants, or family photos. They work beautifully in kitchens, bathrooms, living rooms, and even home offices.
Step 1: Choose the Right Floating Shelves
Start by selecting the floating shelves that match your space and style. Paint-grade floating shelves are a great choice if you want to customize the color to match your home’s decor. Discount Kitchen Direct offers high-quality paint-grade shelves in multiple lengths, ready to finish or paint as you see fit.
If you’re going for a natural or wood-toned look, opt for a pre-finished floating shelf. These come in various stains and styles to match both traditional and modern interiors.
Step 2: Pick the Perfect Location
Floating shelves can work in just about any room. Use them in the kitchen for open shelving with glassware or bowls, or in the bathroom for towels and decor. They also shine in home offices, bedrooms, and entryways.
Think about both function and style. Where will a floating shelf be both useful and beautiful? Once you decide, move on to measuring and wall prep.
Step 3: Find the Wall Studs
For secure installation, it’s best to anchor your floating shelves into wall studs. Use a stud finder to locate the vertical studs behind your drywall. Once located, mark each stud position with pencil or masking tape. Floating shelves should always be aligned with studs for maximum strength, especially if you plan to place heavier items on them.
Step 4: Mark and Measure for Shelf Placement
Decide how high you want the shelf or shelves to sit, and how much space you need between them (if stacking multiple). Leave room for items like vases, books, or small appliances. Mark your shelf placement with a level to make sure everything is even.
Step 5: Install the Brackets
Align your shelf brackets with your stud markings. Use a level to make sure they are perfectly straight, then screw the brackets into the wall. A power drill will make this part faster and more precise.
Step 6: Attach the Shelf
Once the brackets are mounted, slide your floating shelf casing into place. Secure it with screws underneath, if your model requires it. Be sure to clean the shelf surface and allow any paint or finish to dry fully before final installation.
Step 7: Style and Enjoy
With your floating shelves installed, it’s time to decorate. Add your favorite framed photos, books, greenery, or collectibles. Whether you’re styling a modern kitchen or adding charm to a guest room, floating shelves provide the perfect balance of form and function.
Shop Floating Shelves at Discount Kitchen Direct
At Discount Kitchen Direct, we carry a curated selection of floating shelves designed to elevate your space. Choose from lengths ranging from 24 to 54 inches, in ready-to-finish paint-grade wood. Our shelf kits include mounting hardware and clear installation instructions—so you can bring style and function to your walls with confidence.
Browse our collection of floating shelves today and start your next home upgrade with DKD!